Since the launch of the first iPhone in 2007, Apple has never looked back. With its robust and premium quality devices, Apple is ruling the smartphone market. This rise of the Apple phone has significantly boosted the popularity and development of iOS applications.
Developing iOS applications has become crucial for businesses aiming to reach a wider audience through mobile apps. The choice of app framework plays a significant role in determining the efficiency and success of the development process.
According to Statista, there are approximately 2 million iOS apps in the Apple App Store. From them, users have downloaded around 8.1 billion apps. Considering these ground-breaking findings, it would be a shame to miss out on joining this expanding industry. Currently, there are two significant technologies to build iOS apps: Swift and Flutter. So, let’s see which technology can assist you better in your iOS app development endeavour. Swift or Flutter?
Well, both app frameworks have a dedicated client base and have been proving their worth for a long time. Swift is a high level programming language designed for Apple platforms, while Flutter offers a cross-platform solution for mobile apps. Hence, contrasting the worlds of Flutter app development and Swift app development is a complex equation.
As a leading Flutter app development company, we will use our extensive app development experience in this post to compare the two widely used iOS programming languages, Swift and Flutter. Plus, explain their subtle differences in detail. You can use this to decide which one to pick and why for your iOS development objectives. We will also discuss how to compare Flutter with Swift to help you choose the best option for your mobile apps.
- The Need for Comparison
- What is Swift?
- Key features and advantages of Swift
- Drawbacks of Swift
- Top Companies Who Use Swift
- What is Flutter?
- Key features and advantages of Flutter
- Drawbacks of Flutter
- Top Companies Who Use Flutter
- Key Difference Between Flutter and Swift
- Detailed Comparison: Flutter vs Swift
- Which is best? Flutter or Swift?
The Need for Comparison
Choosing the right framework is pivotal in the ever-evolving landscape of iOS app development. Hence, the need for a thorough comparison between Flutter and Swift arises. As developers, understanding the strengths and limitations of each platform empowers us to make informed decisions.
While Flutter’s cross-platform capabilities promise efficiency and code-sharing, Swift’s native integration ensures a seamless user experience. By delving into this comparative analysis, we equip ourselves with the knowledge required to embark on successful app development journeys tailored to our unique project requirements.
When comparing Flutter and Swift, it is essential to consider all the points to ensure the chosen technology aligns with the needs of the target audience.
What is Swift?
In 2014, Apple Inc. created the programming language Swift. Designed as a native language for the Apple ecosystem, Swift is tailored for building high-performance applications on Apple devices such as iPhone, iPad, Mac, and more. It was created to be compatible with Apple’s operating systems and frameworks, including iOS, macOS, watchOS, and tvOS. Furthermore, its most recent stable release, 5.3.1, was released on November 13, 2020.
Before it is executed, Swift code is compiled into machine-readable code. It is recognized for being unambiguous, readable, and easy to use. Because of this, it is a strong language for creating native iOS applications. Swift can also interoperate with existing Objective C code, allowing developers to integrate new features or migrate legacy codebases within the Apple ecosystem seamlessly.
Additionally, a wide range of libraries and frameworks that are already present in the system makes it simple to carry out routine activities like working with user interfaces, networking, and data storage.
Swift is versatile and can be used to develop not only mobile apps but also desktop apps and native iOS applications, making it suitable for a variety of projects within the Apple ecosystem.
This can be especially useful for applications that need to manage big amounts of data or real-time data processing.
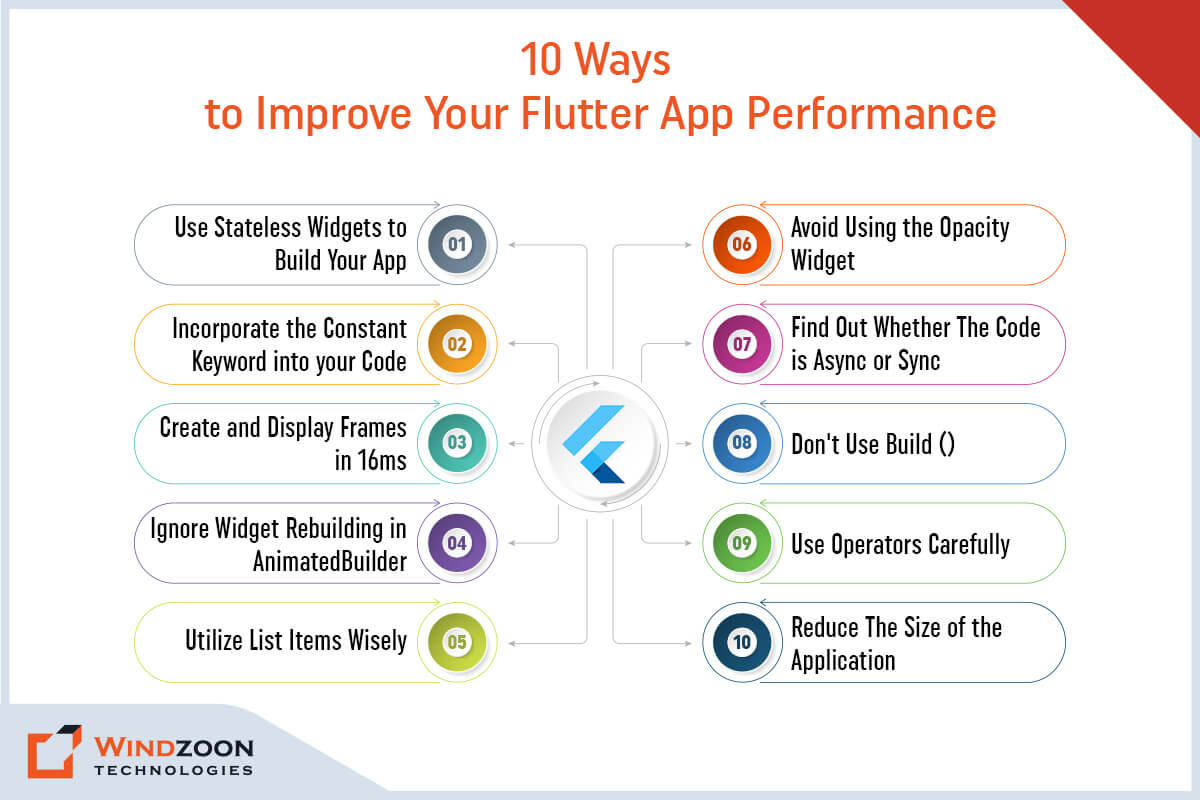
Key features and advantages of Swift
1. Performance
The fundamental advantage of adopting Swift to design apps is that the performance is fantastic, and the code is simple to read and write. This makes development easier and provides speedier coding because you do not have to worry about several levels of memory management or complex objects, as in Objective-C. Besides, it offers developers more flexibility than any other iOS programming language in history.
2. Safety
Both novice and professional mobile app developers can quickly grasp the script without having to master new syntaxes, making learning easier for newcomers. It drastically increases productivity by slashing development time by many hours.
3. Robust Tools
In terms of Swift tooling support, Apple offers a variety of tools for developers. Because of this, learning Swift and using it as their programming language is made simpler for developers. Examples of the tools are compilers and static code analyzers.
4. Versatility
Swift is less restricted than other programming languages when it comes to the libraries and frameworks you can utilize to create your project. It implies that you have a variety of options when selecting a framework that significantly raises the calibre of the development procedure.
5. Built-in Native Error Handling
Swift comes with built-in try/catch/throw syntax support for handling errors. As a result, writing code that manages errors and averts unexpected crashes is made simpler.
6. Open Source
Swift is backed by a diverse set of open-source libraries and frameworks that allow you to customize and develop your app. It improves your app development abilities and lets you reuse features across the globe.
7. Debugging
Swift provides robust debugging tools, like interactive debugging with Xcode and LLDB, that make it simple to find and repair programming errors.
Drawbacks of Swift
- Comparatively fresh language: Swift is a relatively new language. As a result, certain of its resources and capabilities are less robust than those of other programming languages.
- Poor cross-platform compatibility: Even though Linux, Windows, and other Apple platforms are supported by Swift, native iOS programming is where it shines.
- Focus on native platforms: Swift is primarily designed for native platforms like iOS, macOS, watchOS, and tvOS. This focus can limit flexibility in your tech stack, especially if you need to integrate with cross-platform or non-Apple technologies.
- Regular updates: Swift is a more recent language that receives regular upgrades. Finding the appropriate tools to assist with particular activities may be difficult as a result.
- IDE assistance: The official Apple IDE, Xcode, has issues with syntax highlighting, autocomplete, refactoring, and building, among other support features.
Top Companies Who Use Swift
Following are a few examples of well-known apps created with Swift:
- Airbnb
- Lyft
- Slack
- Uber
- Zomato
What is Flutter?
Flutter is an open source ui framework and a ui toolkit developed by Google that enables developers to create natively built desktop, web, and mobile applications from a single codebase. It was created by Google and launched for the first time in May 2017.
Flutter allows developers to build apps and create applications for multiple platforms, including android app development, using a single codebase.
Using the Dart programming language, Flutter offers a wealth of pre-built widgets and tools that simplify the process of designing stunning and responsive user interfaces. By employing the same codebase to develop apps for both iOS and Android platforms, flutter developers can help you save on both development time and costs.
Flutter’s simplicity, adaptability, and quick development cycles have helped it become more popular recently. It is regarded as one of the top 4 frameworks for developing mobile applications. Over 24000 Flutter apps have received over 11 billion downloads.
Flutter supports various IDEs such as Android Studio, Visual Studio Code, and IntelliJ IDEA, making it accessible for developers with different preferences.
To learn more about Flutter app development kindly follow our detailed blog on Flutter App Development: Everything You Need to Know.
Key features and advantages of Flutter
1. Rapid Interface Development
Every development project requires the creation of a mobile app interface. This is exactly what Flutter iOS excels at. In comparison to native development, it offers a quicker method of UI creation and scales across several form factors. Since the framework functions flawlessly on both Android and iOS, it has grown in popularity over the past few years.
2. Hot Reloading
A hot reloading feature is an example of fluid development as opposed to conventional techniques that need manual procedures for any change you make to the code. It eliminates guesswork and enables code changes without requiring a rebuild of your program.
3. Cross-Platform Development
The fact that Flutter does not require any platform-specific code means that virtually any app can be created utilizing this framework. It is one of the main causes that led Google to select this framework, and other organizations are now doing the same.
4. Tooling Support
With its own set of tools, IDE, and compiler, Flutter for iOS makes it simple for developers to work with Flutter code. The tooling support consists of tools like the flutter editor, and simulator, among others.
5. Debugging
Compared to native development tools, the Flutter iOS app’s debugging tools are simple to use and efficient. This is due to the fact that hot reloading helps Flutter developers and gives them the opportunity to immediately see how their work is going on actual devices.
6. Widget Library
The rich collection of pre-built widgets offered by Flutter’s widget library enables developers to design user interfaces that are both attractive and functional. The widget library’s extensive customization and extensibility make it simple for developers to produce personalized and distinctive apps. A couple of examples are the Cupertino bundle and Material Design.
7. Open-Source
As an open-source framework, Flutter is available for free, and a significant and active community of developers actively contribute to its development. As a result, it is a dynamic and ever-changing framework.
8. Native Performance
Since Flutter apps are natively compiled, they can operate at native rates on both the iOS and Android operating systems. It is simple to integrate APIs and third-party interfaces for app development. As a result, users experience great performance and seamless interactions.
Drawbacks of Flutter
- A Quite New and Untested Platform: Despite being a popular framework among cross-platform developers, Flutter is still a relatively new framework. It suggests that there aren’t many learning resources available. As well as there aren’t many plugins or packages either. Therefore, to implement specific functions, developers may need to use bespoke scripts. The development of specialized tools, increased functionality, and community expansion will take some time for Flutter.
- Limited Third-Party Libraries: Although the number of packages and plugins for Flutter is rising, the framework is still relatively young, and there aren’t as many third-party libraries available for it as there are for more well-known frameworks like React Native.
- Limited Corporate Acceptance: Although Flutter is still relatively young and hasn’t been adopted by large organizations as much as other frameworks, it has acquired a lot of traction in the development community.
- Poor iOS Support: Flutter is a Google product, hence, iOS support is far less effective than Android support. Even most SDK features that function properly on Android behave terribly on iOS.
Top Companies Who Use Flutter
Following are a few examples of well-known apps created with Flutter:
- Google Ads
- Tencent
- Stadia
- BMW
- Xianyu by Alibaba
- Dream11
- Reflectly
Key Difference Between Flutter and Swift

[wpdatatable id=20 table_view=regular]
Detailed Comparison: Flutter vs. Swift
1. Integration and Development
Swift and Flutter are both convincing choices for integration and development.
On the one hand, Flutter features a plethora of plugins and packages that may be integrated into apps. Additionally, it enables the integration of third-party services like Google Maps and Firebase.
Swift also contains a ton of frameworks and system APIs that make it easier to create effective iOS applications. Additionally, Swift and the Xcode IDE provide many innovative features and tools for creating iOS applications.
2. Accessibility
It means making your application’s UI/UX more accessible to individuals with disabilities. This aspect must be taken into account when creating an iOS application because it helps to ensure that the app is usable by everyone. The accessibility function in the UIKit framework is included by default in Swift. However, the UIAccessibility protocol requires developers to supply the appropriate accessibility information for each UI element.
Contrarily, Flutter lacks the built-in accessibility functionality. However, according to the documentation, you may use XCode’s Accessibility Inspector tool to examine the iOS apps. It also has an outstanding issue with adding accessibility identifiers for testing, which has been ongoing since 2018. We can therefore conclude that Swift is more accessible than Flutter.
3. Onboarding Process
In terms of the onboarding procedure, Flutter provides simple onboarding along with detailed instructions. It includes a straightforward and comprehensive step-by-step manual for configuring the development environment on Windows, Mac, or Linux.
Additionally, Flutter offers a wealth of materials to aid developers in becoming proficient with the framework. Videos, tutorials, and example apps are among the resources that Flutter provides. Furthermore, Flutter offers a large and active community that is accessible for assistance at every stage of the app development process.
Swift, on the other hand, requires the Xcode IDE and has a more challenging onboarding process because understanding the syntax is equally difficult. Xcode, on the other hand, includes a plethora of tools and resources for learning and developing apps, such as a code editor, simulator, and debugging tools. Plus, Swift has also a very big and active community, available to help during your iOS app development process.
4. Performance
Being a native framework, Swift is more effective and aids in producing apps that are quick, slick, and reliable. Swift has a comprehensive set of system APIs and produces code that is well-optimized, both of which can improve the performance of applications.
Additionally, Swift offers sophisticated memory management features like automated reference counting to guarantee efficient memory usage. Swift is also your most practical alternative in terms of performance when it comes to apps that include tasks requiring a lot of computation power.
But if you desire a framework that has cross-platform functionality then Flutter is your best option. As it offers better cost-efficiency than Swift in terms of iOS app development. Also, Flutter utilizes a layered architecture. It minimizes the expense of platform-specific APIs, which results in better efficiency.
Furthermore, Flutter utilizes Dart Garbage Collector; it consists of Ahead of Time (AOT). This enables quick communication with the device. Also, the Flutter animation package allows smooth, intuitive UIs and many Flutter animation widget features pre-set effects, but they can be customized to your particular requirements. Hence, if you don’t have so many expectations from your iOS app then choosing Flutter is the viable option. As it performs as equally as native Swift.
5. Development Cost
If you choose native app development with the Swift coding language, the cost of iOS application development would be higher. This is due to the fact that employing iOS developers who are native coders may come at a higher cost than recruiting Android developers.
However, if you hire Flutter app developers, you may create your own team using a variety of recruiting models at relatively reasonable costs. Also, these developers will work with you to create apps for Android or cross-platform apps (apps that operate on both iOS and Android). Eventually, the cost of developing an app will fall dramatically. Without a doubt, when choosing between Flutter and Swift in this category, Flutter won.
6. Development Time
With a single command on the Flutter apk, Flutter provides the total time it took to construct an app. However, when it comes to speed, particularly for clean builds, developing an iOS app with Flutter could take a little longer than developing a native iOS app. However, Flutter picked up the pace after the initial clean development phase.
On the other hand, Swift native iOS app development time can be estimated using the Xcode command line. Here, the time is displayed once you finish building your app and execute the build command via the product menu. Thus, we can say that when it comes to time to market, Swift wins on this metric. In contrast, Flutter will be a better option if you need to create apps for both platforms.
7. Learning Curve
Flutter has a very basic and quick Learning Curve, especially when you are already acquainted with object-oriented programming languages such as Kotlin or Java. Additionally, its extensive and thorough documentation makes it even simpler to learn. However, mastering the Flutter framework still demands practice.
In contrast, Swift offers a more complicated learning environment than Flutter. It can be difficult to learn for developers who are unfamiliar with iOS application development or functional programming. As it has a more complicated development environment than Flutter and requires greater effort to grasp. Additionally, Swift contains an extensive and complex standard library, which is another challenge to conquer.
8. Application Size
It’s time to assess the product’s size and complexity after the identical application has been developed in both Flutter and Swift. As previously said, the native Xcode and Flutter platforms each have advantages and disadvantages.
However, if we assume the same product on both platforms, a native iOS app was 25 MB in size, compared to the locally generated program, which had a file size of more than 50MB (despite the fact that it has some components and other integrated icons).
In terms of complexity, both applications could work seamlessly and without errors; nonetheless, a seasoned iPhone user may be able to differentiate between a native and non-native iOS application.
9. Stability
Despite the fact that both of these technologies are still developing and in their infancy, there are no stability issues. In order to boost performance, Flutter has a committed team of developers at Google. As a result, Flutter has outstanding stability and dependability. It entails automated testing tools for detecting and resolving vulnerabilities before they impact users. Swift, however, places a priority on security and reliability. Swift developers at Apple work diligently to avoid any errors or crashes. This results in an amazing user experience.
10. Documentation
Flutter comes with extensive documentation that includes explanations and examples to make it simple to learn. Developers may experiment with new widgets and observe changes in real time thanks to its well-written documentation.
Additionally, Swift provides a wealth of documentation that addresses syntax, types, classes, functions, and other topics. Its online documentation, Swift Playground, allows users to generate and test code in real-time. Thus, we may conclude that both Swift and Flutter have extensive documentation.
Which is best? Flutter or Swift?
In conclusion, there is no “one size fits all” approach when comparing the two tech giants Swift and Flutter. There are various things that could affect app development for iOS devices. They are as follows: the availability of tools, project deadlines, qualified personnel, budgets, timeframes, API levels, seamless integration, and the availability of flexibility, speed, and performance.
if you go for Swift then it provides native performance, a solid type system, and potent development tools like Xcode. On the other hand, Flutter offers cross-platform development, quick reload, rich widgets, and speedier development. Whichever solution you decide on will ultimately depend on your priorities and the requirements of your app.
As a well-known iOS App development company, we provide extensive Flutter app development services for creating cutting-edge, highly useful applications to transform your business operations.
Hire Flutter Developers from us, who are capable of converting your specifications into a logical, business-ready application with a beautiful and high-quality user experience.
Please contact us to for our iOS app development services.